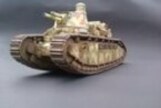
Char 2C
French Super Heavy Tank
Meng Model | No TS-009 | 1:35

Факти
- Марка:
- Meng Model
- Наименование:
- Char 2C French Super Heavy Tank
- Номер:
- TS-009
- Мащаб:
- 1:35
- Тип:
- Пълен комплект
- В продажба:
- 2013 Нова матрица
- Баркод:
- 4897038550418 (EAN)
- Опаковка:
- Твърда кутия (с отварящ се капак)
- Тема:
- Char 2C » Танкове (Превозни средства)
Маркировки
Char 2C
 Armée de Terre (French Army 1455-now)
- 51 BCC 93 ALSACE
1939
Light brown, Camouflage Green - 51 BCC 90 POITOU
1939
Olive brown - 51 BCC 97 NORMANDIE
1939
Olive brown
Съдържание на кутията
Размери:
390x250x95 mm
(15.4x9.8x3.7 inch)
Тегло:
820 g (1.81 lbs)
Хронология на продукта
Meng Model
2013
Инструкции
Изтегли 3631Kb (.pdf)
Пазар
No partner shops available
Преглед на съдържанието
Външни прегледи
Реклама
Всички отзиви » (11 общо)
Списания
Всички списания » (4 общо)
Коментари
Surprisingly easy build. Not a ton of parts and large, easy to attach PE. I only encountered a few problems with the build.
The tracks. It was great that they were already cut off the sprue and snap together, but... The locking pins are understandably small in order for the track links to snap together. That caused me a problem when trying to snap the last one together as I wrapped one of the sides. The tracks have to be tight so that they don't sag off the road wheels in the front. That put a lot of strain on the pins. I had to selectively put CA glue and accelerator in spots where the links pulled apart. On the other side, the tracks came up a half link short. Absolutely no clue how this could have happened. I ended up cutting an extra link in half and adding it near the rear of the tank. It's only noticeable if you really look hard. After I had the tracks in place, even the most minor of handling would cause one of the track links to pop. I attached them at the very end of the build but before I added the exhaust system (for ease of painting).
I had at least a 4-5mm gap between part A37 and the lower hull. The part is attached in step 4 and then that subassembly is attached to the lower hull in step 10. By then, the cement was totally cured. I added a piece of sheet styrene to fill the gap. I think it was user error. There are two tabs on part A37, and perhaps I should have made sure they completely and firmly attached to the upper hull. Maybe that would have set a better angle (although I thought I did that when I attached the part in the first place).
As stated earlier, I installed the exhaust system as my last step. Painting all the parts off the tank was so much easier. However, there are many small, fiddly parts that attach behind other parts. It took longer than if I had just installed it as laid out in the instructions because it was hard to see where some of the end pieces attached. My suggestion is to leave the engine compartment off the tank, pant the exhaust system and engine compartment separately, attach all the pieces to the engine compartment for ease of viewing, and then attach the engine compartment to the tank as the very last step. The fit is perfect so you shouldn't need to do any paint touch ups.
The above comments aside, this is a really nice kit, and I'm glad I have it in my collection. For your efforts, you'll end up with a huge tank that looks impressive on your shelf. I have it near the FT-17 I recently built and it dwarfs it. Amazing how tank design exploded in just a short amount of time.
2 20 April 2024, 20:34
Long didi it have a place on the shelf of shame...now due to corona i finished this big "thing"...build went well, painting was a horror due to the size...
1 5 April 2020, 17:11
If you'd like to see this monster moving, have a look here:
Youtube Video

9 February 2014, 20:56
Проекти
31 снимки
Char 2C
1:35
Char 2C
No. 93 "Alsace" 51st Bataillon de Chars de Combat
France - 1939
Проект: Char 2C
All projects » (9 общо)
Галерия
Всички статии » (5 общо)
 база данни за моделиране на gundam | Управител на личния склад


